“Do not go where the path may lead, go instead where there is no path and leave a trail.”– Ralph Waldo Emerson
Hand the average person today a paper map, and they might ask you where to punch in their destination address. The sad truth is that many people have become so dependent upon technology that they can’t provide directions or even understand and retain verbal directions when they are given. After a disaster, it isn’t uncommon for people to leave their area and for roads to be impassable due to floods, debris, downed power lines and potentially looters.
Knowing how to get out of your location, traverse the terrain, find the natural trails, and know your location are critical skills to develop over time. The more you work with these skills, the better you can function and travel after any crisis. The chief skill to have, which gives you a massive advantage over others, is the skill of map reading. Though this is true, when most people unfold and look at a map, their eyes rarely wander off the carefully etched roads, which may be the last place you want to be after a disaster.
In this course, we will cover basic map reading and orienting, that is, using a compass to understand your position on a map, as simple as we possibly can. Consider it a crash course in map reading and terrain navigation with an easy 3-step process that will get you effectively away from where you are to somewhere, hopefully, safer. Humans are explorers, so there’s so much to know and understand about navigating our world, even without a compass and map. For our purposes, we will start with both a map and an orienteering compass. Let’s understand this better…
Please consider subscribing to our newsletter to give you updates and member-specific content. Visit https://www.cityprepping.com/newsletter/
We’ll lead this course off getting right into the 3 step process. After we cover this, we’ll discuss the type of compass and map you’ll want. For this course, we’ll focus on the standard magnetic compass and a typical map you can get at your local AAA. While these are simple tools, they are very powerful for navigation if the grid were to go down and are easy to learn with practice.
THE 3 STEP PROCESS
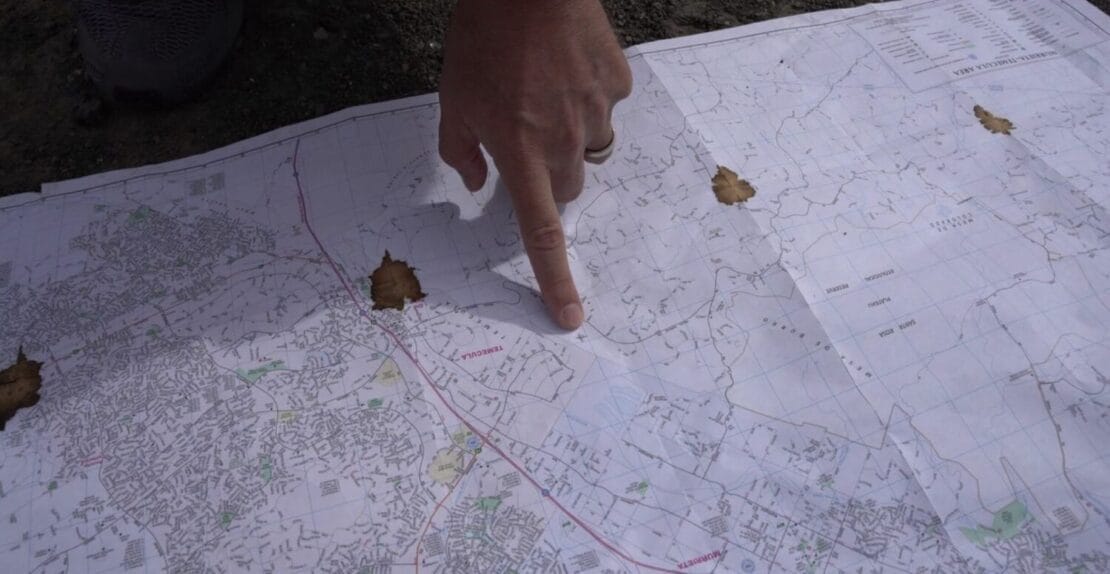
In our scenario, we will navigate from the rural western part of our map to the largest source of water in the area to the East. We will assume that most roads are impassable for vehicle traffic, either because of whatever disaster we are in or because of personal safety concerns. While we can look for routes that we might travel along, we must assume that most roads will not be safe. We will also assume that electronics aren’t working, so we are at the mercy of our knowledge of the area and what we can determine from the map.
We are also assuming we know where we are starting from. Even if we don’t know our exact location, the starting point is the same. First, spread the map out as flat as you can. You’re going to use the map’s compass rose North and your compass to determine your direction of travel. There are a few essential components of the map you need to know. The Compass Rose shows the map’s North direction or all the cardinal directions, North, South, East, and West.
The other parts are the Legend or Key, which will explain what the marks on the maps are: waterways, minor roads, large roads, tunnels, tracks, shelters, schools, campgrounds, off-road and recreational areas, and more. The other part you should know is the scale in miles or kilometers depending upon your region. That is usually in the legend, as it is here. It is commonly called the scale bar. It will tell you the equivalent of an inch or centimeters to miles on your map. Without going too deeply into that, you can measure the equivalent distance on a piece of paper or stick, then move it end-to-end across your map from your location to your destination to determine the distance of the straightest path between. If you are following a road, trail or waterway, you can run a thread along the route and curves between your starting point and your destination then measure the entire thread’s length against the scale.
Any cartographers viewing this are probably cringing at my oversimplification of it and the fact that I’m not covering all of the other significant parts of the map. Still, for this demonstration, we are only going to be using the compass rose and our compass to determine our desired direction of travel.
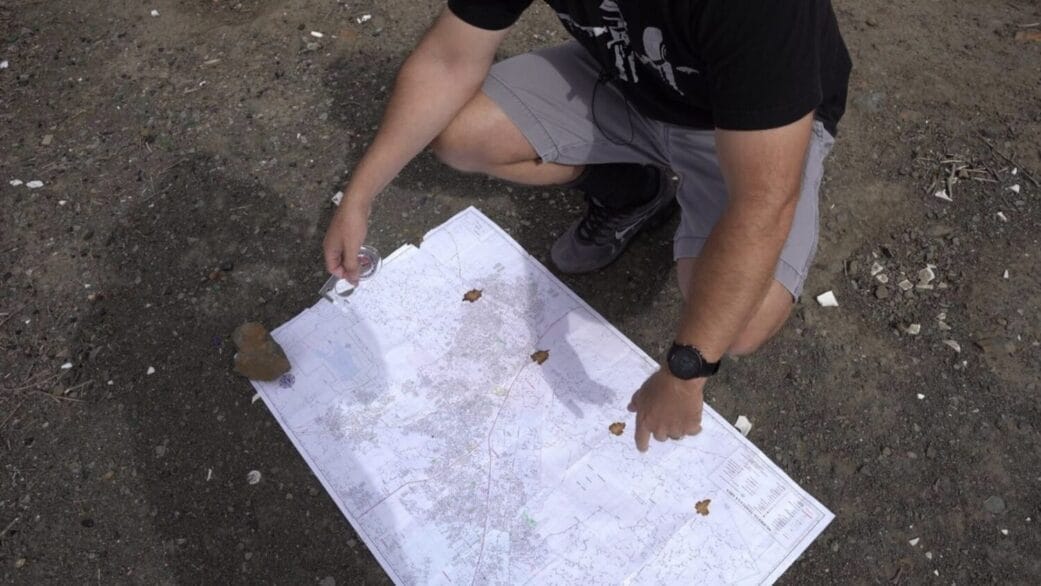
So, Step 1: With the map spread out, I like to assess the map and horizons for any known landmarks. If you can see a mountain peak and it’s marked on your map, you will have a better sense of orientation and distance. If you are on flat land, but you can make these assessments by lakes, rivers, roads, or any other distinguishable feature of the landscape, you will have a better understanding of your terrain and distance. I also like to orient the map using the compass, and the compass rose on the map to be facing North, even if my intended destination is behind me. From your marked starting point, you want to place the baseline of your compass, that’s the long edge of your compass, in a straight line between your location and your destination. If you are traveling a reasonable distance, drawing a straight line on the map is perfect for forming this line, or you can choose a waypoint in the estimated direction of your journey to break your larger journey into more exact chunks within the scale of the baseline of your compass.
Step 2: Once you have your compass on the map with the long edge between your destinations, rotate the bezel to turn the large outlined red arrow and the orienteering lines to the North-South vertical grid lines on your map. To be clear, your red needle will be pointing North, but your outlined arrow and orientation lines will be pointing to the North on the map. They won’t be in sync with each other unless your destination is directly magnetic North of you. This is fine.
Step3: Once your compass has been aligned between your destinations and your bezel rotated to place the orientation lines parallel to the North-South grid of your map, you may now lift the compass from the map and rotate until your red magnetic needle is contained within the red outline arrow on your bezel. When you have them aligned this way, look at the direction of the travel arrow at the opposite end of your compass. That is the direction you want to travel to get to the point on the map you specified. Those are the three steps to traveling in the right direction.
In our case, the distance is much further than the baseline of our compasses long edge, so we’re going to pick a location along the edge and head for that. Then, once we get to that location, we’ll set another waypoint and head for that. In this incremental journey, we will be able to assess each leg of the journey ahead of us instead of blindly following along a course that may be treacherous.
Again, it is always best to frequently orient against the map and only traverse your visual range between reorienting yourself on the map. This will ensure you are moving in the right direction. Walking in nature is rarely done in a straight line as you have to weave around landmasses and terrain that is too difficult. That is why it is always best to find a visual landmark in the distance along your orientation route and then travel in that direction. If you are on flat land with no distinguishable features or no discernable landmarks, keep your compass out, and the arrows aligned and walk as closely as you can in the direction of the direction of travel arrow. In some cases, you can remain generally aligned by using your position in orientation to the sun’s location, but the sun is moving across the sky East to West, so your orientation to it will change over the course of the day unless you are traveling due East or due West.
The best method to stay on target and keep your mind occupied with the distance you are traveling is to count your steps. Assuming you don’t have a pedometer and the landscape is relatively flat, an average person has a stride length of approximately 2.1 to 2.5 feet. That means that it takes about 2,000 steps for a person 6’5″ to walk one mile. A 6 foot tall person would take 2,130 steps per mile. A 5’6″ person 2,324, and a 5-foot person 2,500 steps. If you walk in the direction of the travel arrow and check your orientation against the map every 500, 1,000 to 2,000 steps, you will be able to navigate even the most disorienting terrains. Your goal is to be heading in the direction of your destination within a few degrees, but the terrain doesn’t always allow you to do this. If you have to go over a mountain or hill or around a river, you might not even get to a count of 500 in your direction of travel. After every major off-path excursion, pull out the map and reorient yourself. Counting the steps when generally traveling straight in the direction of your destination will allow you to compare the miles to the scale of the map to know how far you have come, where you are, and where you still need to go.
This is far superior to just guessing and moving in a direction based upon that guess. Most people really don’t walk straight. They lean slightly left or right. Even on a flat plane, given enough distance, a person is likely to walk in a very large circle. At best, they would walk widely off their intended target. Using a map and a compass allows you to stay on track and moving toward your destination regardless of how many twists and turns your road may take or how many obstructions you have to navigate circuitously.
Now that we’ve covered the basics of using a map and compass, let’s discuss the tools a bit more.
THE COMPASS

Magnetic compasses rely upon one side of the magnetic needle being drawn to point at the North magnetic pole. When shopping compasses, you should be concerned with the compass you buy. A cheap compass from China, though most of the compasses you can buy are made in China, can be wildly off in pointing North. When I was teaching basic orienting to a group of kids, I purchased several compasses online and noticed many were not pointing north. If you’re traveling a long distance on unfamiliar terrain with poor distance visibility, however, you could end up far away from your intended destination. I did manage to find one basic compass with the features I wanted at a price that didn’t break the bank. I will link to it in the comments below.
For our introductory lesson, we will be using a magnetic base plate compass with orienting lines, a direction of travel arrow on it, and a small magnifier, among the main features of it. First, let’s define the parts of the compass we will be using. This compass uses a liquid-filled capsule to house the needle, which works slightly better than the floating needle encapsulated in air. The fluid won’t freeze, but it sometimes forms bubbles, which don’t usually impact needle movement. One side of the magnetic needle is red, and the tip of that needle should always want to point North.
This compass has a rotating bezel and orientation lines below the needle which we discussed earlier. Moving up from the bezel, there is a magnifier for assisting you in reading the details of your map. Above that is an imprinted arrow. The arrow is referred to as the direction arrow or the D.O.T., Direction of Travel, arrow. The sides have scales and rulers, which I won’t cover in this video, but you would use them in conjunction with your map to determine the distance between you and your destination or waypoint. We did skip the discussion of the declination scale, as for this lesson as we want to focus on the basics to get you comfortable with a compass for local emergency situations. Now, the map.
THE MAP
Research has shown that people who use paper maps versus electronic navigation are more apt to travel to their destination faster because they head directly to their next landmark or turn. Also, they are more likely to be able to return navigate to their starting point from memory. The theory is that the brain is constantly engaged and constructing representations and identifying landmarks, whereas being spoon fed the electronic directions dulls these observational faculties.
After a disaster, even if GPS is still functional, printed maps will be far more effective. If there are three roads away from your location, but they are all impassable because of debris, or they’re completely destroyed, you are stuck with an electronic roadmap of only these three impassable roads. However, on a printed map, you could maybe find a walking trail or a creek that runs through an area that will shortcut you to a safer route and out of harm’s way.
So, if you live in a more rural setting with nature trails, you may want to seek out a map that provides you good information on the topography of your area. For our purposes, I will use the most likely accessible map that a person would have– your basic City Series roadmap from the Automobile Association of America, triple-A. It will lack much of the finer detail, but it will provide enough to navigate by, even somewhat off the roads, if only across mild terrain, to get to a safer road. If you don’t have at least one of these in your prepping supplies, make obtaining one your absolute priority. Many people don’t have any printed maps or instead just a State level map in the glove compartment. That’s fine when you can travel on roads long distances, but a local area map is more important to you after a disaster.
In an actual SHTF situation, that local area map, while only representing 20 miles across, might be the entire breadth of your navigable world. After any disaster, you can put out of your mind traveling hundreds upon hundreds of miles to your safe space. Hollywood makes movies about that precisely because it is so perilous. Many people don’t even own the shoes to get there or aren’t fit enough to make the journey. Suffice it to say that after a disaster, your world gets a lot smaller, so the detail afforded by a smaller regional map will be to your benefit. I will be launching a companion video to this one in the near future that will go into more information on maps and how you should be marking your map up as a prepper.
If you anticipate your bug out or escape route will involve having to leave the roadways significantly, seek out a backcountry, topographical, or trail corridor map of your area. These specialty maps fill in those solid colors on your roadway map with details about terrain, unpaved roads, trails, and more. If you have ever tried to travel in the wild, you will know that one large hill covered in overgrowths can make the shortest distance between two points impossible. You may have to travel all the way around the obstacle unless you know the backpacker’s, hunter’s, or mountain biker’s trail over it.
CONCLUSION
There’s so much to maps, navigation, and using a compass. This 3-step process is just the basics. It’s a big basic, though. If you understand this 3-step process and can put it into practice, you’ll be able to confidently use a map to get heading in the correct direction. Then, with your terrain’s visual cues and the map’s noted landmarks, you should have what you need to navigate even a post-disaster landscape. What do you think? Do you have anything to add to this 3-step process? Have you used this before, or did you not know this but needed to use a map?
As always, stay safe out there.