How To Build a Survival Cache

September 10, 2021

A survival cache is a container, often buried, but sometimes just stashed away in a location away from one’s home.  Its purpose is simple.  It contains necessary items you will need if a disaster or crisis ever places you in a desperate enough situation to have to dig it up.  This video will focus on a cache that is accessible to support you if you had to travel to a safer location, such as a bug-out location if you have one, or along a route you may frequent daily, traveling to and from your house, like when going to work.  Think of it as a minimal bug-out bag but out there in the wild somewhere and not in your closet.  In this video, we will look at the important considerations such as what type of container to use to store your items, where to store them, and what items to add, and what to avoid.  So let’s jump in.

Survival Cache Options

Ideally, you will want to ensure that your survival cache only contains enough for just you to carry.  The chances are you will merely be picking its contents and moving along to your next location.  For this reason, some people bury more than one cache along a route they anticipate they will have to take after a crisis or disaster occurs.  In my opinion, the ideal size is about the size of an ammo box, a short length of 8 to 10 inch PVC tube, something like a water brick, or even a 5-gallon bucket.  The perfect survival cache is roughly the same size as a loaf of bread or two, but even a well-sealed 5-gallon bucket can be a highly effective container to store your survival items.  I’ll use an ammo can in this video which you can pick up at Walmart or on Amazon for roughly $20.  This smaller size limits what you can put in there.  It is, however, easier to hide, more portable, and more likely to remain concealed.  Be sure to use some vaseline to rub the seal on the inside to ensure the seal works well.

Hiding Your Survival Cache

I’ll do a more in-depth blog shortly about burying your cache, but let’s run over the basics.  

Assuming you have a small survival cache that you plan on hiding on a property you do not own, understand that you may be breaking laws in doing so.  If it is not land you own, it would be ill-advised to store in your cache any firearms or ammo of any kind, but that’s a decision you have to make.  Also, I would not store any identification or documentation of any kind.  As a general guideline, do not damage property and stay away from restricted areas.  A fellow prepper in your Mutual Assistance Group may offer up an area where you can put your survival cache.

Your container should be marked as to what it is on the container’s exterior along with the date it was buried. Merely writing or etching on it “Emergency Kit” will prevent someone from thinking it is dangerous if it is discovered.  Some may disagree with this, but an unopened container of unknown origin is likely to be treated as a potential ordinance.  This can draw multiple law enforcement agencies’ attention and could result in further investigations that may eventually link you back to the cache.

Carefully think about where you want to place your survival cache.  It should be along an emergency route you think you may have to take one day or one you frequent.

When it comes to hiding your survival cache, the most common method is to bury it.  If you do this, place an identifiable rock directly over the spot or measure precisely from two different trees or points, so you will know right where it is.  Make sure that you will be able to find it again, even if natural disasters have severely altered the landscape.  While recording GPS coordinates may be ideal, if you don’t have a GPS device when attempting to recover the cache, you may find it hard to recover.  Ensure there is at least a foot of dirt over it to be less susceptible to the elements.  You can expect that the ground temperature around your survival cache may fluctuate from cool to freezing.  Burying it, however, is just one method.  I have known people to weigh it down and submerge it among rocks in creeks.  Small survival caches can be affixed to tree limbs in high trees.  Some people even put them under sidewalks near their houses.  The rebar in the sidewalk thwarts metal detectors, and the sidewalk is not too difficult to lift or dig under.  Also, if you’re worried about people using metal detectors, you may consider burying it next to a metal fence post or by adding bolts and nuts above it and bury your cache a foot or so under them.  This way, after the person discovers these worthless decoys, they may not be incentivized to dig further.

Be creative with where you hide your survival cache, but make sure that your location will not be discovered.  And, make sure that you will be able to find it again, even if natural disasters have severely altered the landscape.  Finally, make sure your survival cache is both airtight and watertight which we’ll cover momentarily.

What to Include

Different survival caches may contain various items and it’s always hard to do these types of videos as everyone has different variables they will face in a potential bug-out scenario.  I live in a very moderate climate that doesn’t fluctuate wildly like somewhere that may experience extreme cold or heat, so what I pack into my survival cache will be unique to my situation.  Adjust according to your specific needs.  Here, I will provide a framework that can guide you instead of a rigid list defining what exactly you should buy.  I’ll follow Dave Canterbury’s 10 C’s I recently discussed in a video plus a few other items.  I’ll post links in the description and comment section below to the items we cover.

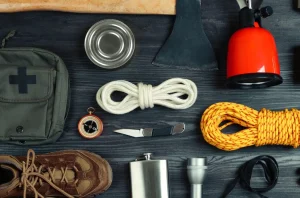
  1. Cover: A tarp or a rain poncho that can double over as a shelter is ideal.
  2. Cutting: a simple, fixed blade knife, such as a Morakniv fixed blade knife will suffice.
  3. Combustion: I’d recommend either matches or Ferro rod.  While I typically prefer something like a Bic lighter, I’d prefer an option that won’t potentially leak the fuel out.  
  4. Container: I personally prefer stainless steel water bottles that can be heated over an open flame.
  5. Cordage: having the ability to strap or tie items down will be useful.
  6. Cotton bandana: these have many applications such as a covering for your head, making a sling, or for pre-filtering water.
  7. Compass: being able to navigate and having a clear direction, especially if traveling on foot will be so important.  In addition, you may want to consider a map of your local area.
  8. Communication: typically I recommend a two-way radio, but I wouldn’t want to store one of these in extreme conditions.  Instead, having a signaling mirror could be very useful.
  9. Candle: normally I have a flashlight of some type for this C item, but exposing the batteries to extreme weather conditions could destroy it.  Instead, having an actual candle would be beneficial.  You could also include glow sticks.
  10. Cargo tape: I recommend Gorilla tape.
  11. Cash: having cold hard cash could be very important as stores may no longer be able to process credit cards if the grid is down.
  12. Chow: I prefer options that are resistant to heat and have a long life span.
  13. Coffee: solid source of energy.  Obviously it requires heating up water, so you may consider other alternative for energy such as these zipfizz energy supplements which you can add directly to water.
  14. Medical kit: a basic kit with bandages, gauze, another other miscellaneous items could be extremely beneficial to have.
  15. Emergency blanket: they’re small but could come in handy to allow you to at least survive the elements.
  16. Write in the rain pencil and notepad: useful if you have to leave a note for someone else.
  17. Water filter: Sawyer mini water filter.  These are small, compact, and can process quite a lot of water.
  18. Deck of cards: if there’s room in your survival cache, consider placing a deck of cards in there.  You may wish for the entertainment.  
  19. Water: depending on your location and situation, water may not be readily available.  For me, I live in a dry location so having a source of water on standby would be valuable.  I would recommend setting up a separate container to store the water in case any of the water leaks.

If you’re concerned about animals smelling the food and digging up the cache, you might consider adding the food into a vacuum sealed bag or mylar bag, vacuuming it out, and then wiping or spraying it with bleach.  This will also help to prevent your survival cache from becoming a petri dish for mold if any moisture should get in it.  You may want to consider putting the different items that are sensitive to moisture in a vacuum sealed bag and adding a moisture absorbing silica gel pack.  You can pick these packs up on Amazon for relatively cheap.

D.E.A.T.H.

When deciding upon what to put in your survival cache, remember the acronym D.E.A.T.H.  If one of your items becomes tainted, it can ruin your entire cache, and you will likely not survive if it was your only chance.  DEATH.  D for will the item deteriorate over time?  E for will the item evaporate or leak moisture of any kind?  Even canned goods have a shelf life, and one stored improperly could explode botulism soup all over your other items one day.  A for anaerobic, in that, will your item give off-gasses over time?  T for toxic.  Will your item become toxic over time?  Some medicines don’t just become less effective over time. They can become toxic.  And H for heat.  Will your item be susceptible to temperature extremes over an extended period?  DEATH: Deteriorate, Evaporate, Anaerobic, Toxic, Heat.  If you remember these things as you place the items into your survival cache, you will be more assured that they will be there, ready for you for many years into the future should you need them.

Conclusion

Survival caches come in many sizes and, as you can see, can contain a variety of items.  I have given you the basics, the essentials, and items I don’t recommend.  Your survival kit may be different, but if you follow the outline we detailed in this video, you can customize and scale up your own kit based on your own needs.  In an upcoming video, we’ll go into more of a deep dive discussing where to bury it and how.  I’ll have an exciting way for you to participate in that, so you will want to subscribe to this channel to know when that video is released.

If you found this video informative and helpful, please click that thumbs-up icon. It’s a little thing, but it helps us build our prepping community.  I would love to hear if you have a survival cache out there somewhere and what you have in it.  

As always, please stay safe out there.


Additional notes

Use an ammo can

  • Put vaseline on the inside seals
  • Wrap in a heavy-duty garbage bag

There are two types of moisture packs.  It is actually good to use both.

  1. Moisture absorber
  2. Oxygen absorber

Note on flex seal. Buy it by the case. If you are real concerned about moisture getting in, close it up and seal it with the flex seal. In fact, you can spray an entire ammo can with flex seal. Be sure to clean surfaces well. Acetone works very well. If you use vaseline, even a small residue on your fingers can screw up the bonding. Acetone solves that.

Other considerations:

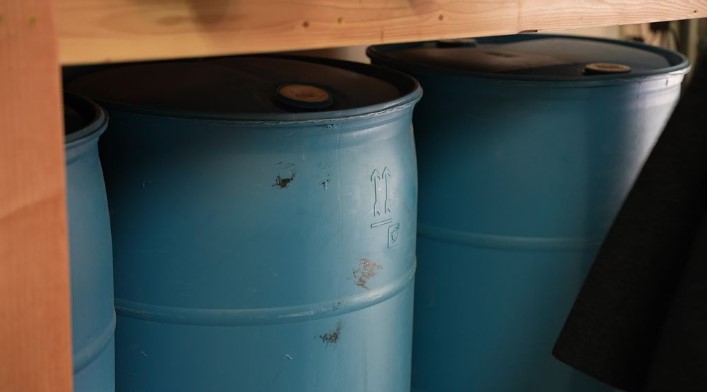
  1. Some containers for changing oil can work. Look for the ones that have the 8″ish hole for the oil to drain into.  If its just a pistol, ammo, and some survival stuff its a decent and inexpensive option.
  2. Dog food storage containers, especially those with gamma seals (but don’t trust them. Use that flex seal on the outside and vaseline on the inside).
  3. There are some large food containers for cereal etc. Water tight but not as durable.
  4. For very large stuff look at small fiberglass septic tanks. These have their own set of pros/cons but are an option if you are looking to do something big.
  5. Look around for companies that import drugs. Many drugs are made in Switzerland etc and they are shipped in bulk inside very durable, water tight containers. I’ve seen 15 and 30 gallon containers. They are USP grade and tough as nails.
  6. Get a vacuum sealer. Those rolls of bags can be slipped over an entire rifle.  Not only that, if your outer container fails, you have a backup layer inside.
  7. If you are concerned about metal detecting, you can consider burying a bunch of old car parts, nails, tin cans etc. all over the area.  Make it really unpleasant to find your stuff. Combine that with the decoy above the cache and you are good to go.
  8. You can accelerate the aging of the metal with acid.
  9. Make sure you can identify your location in the dead of night, rainstorm, under snow, you name it. Pick your spots so you can identify in any condition.
  10. Contents of caches. Think hard about what you will need. Money, ammo, food bars, guns, batteries (package carefully since they can leak), documents, survival blankets, etc.  IDs can be a tricky subject. Do you want your cache loaded with the ID of the person who left it?  This is a subject you can do an entire video on.
  11. If you check on your cache,  do it as a walk by. If you are seen you don’t want to be hanging out in one spot and drawing attention to it. At most, if you are concerned you might be seen, act like you are checking your messages or something but avoid doing anything that may give it away.
  12. Take pictures. Lay out contents on a table, take a picture. When burying the cache, take lots of pictures of the cache location and everything around it. Take a picture of the cache in the hole (be aware for good or bad the gps location of the cache will be embedded in the pic). 1000 words… You can delete pictures if you are concerned but your cache report is just a big a security issue.
  13. Bury deep enough animals are not likely to dig for (primarily if you have food in it).
  14. Pace counts. Specify what your pace distance is and in units people understand, in addition to the count. Make sure those looking for the cache know that you are pacing off one leg or both.
  15. If you bury it in an area you are not from, don’t go looking for it while dressed like a complete outsider. Don’t draw attention to yourself miles before you even get to your cache.
  16. There should be some redundancy. If you have a compromised cache and it contains all of one thing like ammo, you may be screwed.
  17. Remember that when you go to put vaseline on the seals of ammo cans, those seals have two sides.
  18. Sometimes caches can be put in interesting places, each of which will have its own pros/cons and up to you to decide on whether its a good idea.  To whit: hollow of a tree, septic tank, beehive, etc.
  19. Get a 100lb propane tank. Empty it, remove valve, fill with water, drain etc. When you drain it, the water can reeeeeeealy stink, so be prepared. Carefully mark a line about 3/4 of the way up from the bottom. Cut the tank into two halves. Braze a fitting that a 1 lb propane container will screw into, into the inside of the tank, over the exit hole. You may need to muck with the valve of the tank for this. On one part of the tank, weld or braze some thin strapping inside the tank to form a lip and something you can use to seal up the tank.  Once all done, you can install a bottle of propane on the inside, make sure there are no leaks eh? Place the top onto the filled cache, seal it well with something like flex seal and mount the tank in a logical place that looks like you use it for something. Hold the tank up with a strap that goes around the tank, right where the split is. If someone checks the tank they can open the valve and propane will come out. This one is also nice because it is right under people’s eyes and its right where you can get at it.
0 0 votes
Article Rating
Subscribe
Notify of
guest
0 Comments
Inline Feedbacks
View all comments

Newsletter

Subscribe our newsletter

Sign up for exclusive, behind the scenes content and updates.

Agon
0
Would love your thoughts, please comment.x
()
x