
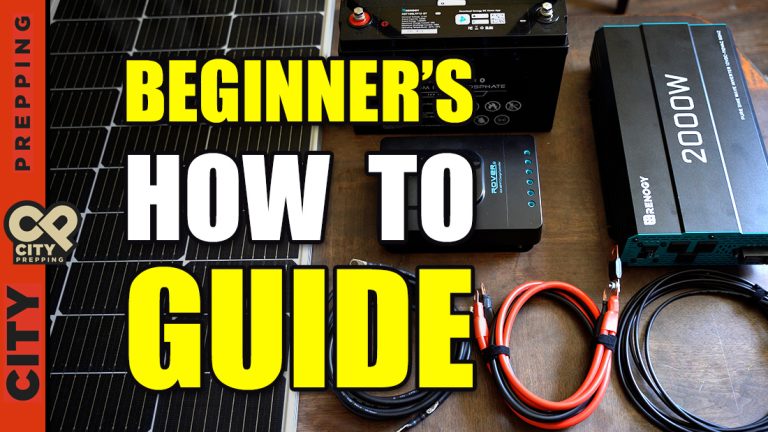
- Cables to connect the charge controller to the battery
- Cables to connect the battery to the inverter
- Cables to connect the solar panel to the charge controller
- Phillips screwdriver (large and small)
- Crescent wrench or socket wrenches
- Needle pliers will also come in handy
Step 1: Connecting the charge controller to the battery
 Let’s grab our battery, charge controller, cables to connect our battery, and our small Phillip’s screwdriver. Please do this step before connecting the solar panels to the charge controller as it will damage the charge controller without first connecting to the battery.
If you look at this charge controller, and this is common amongst most of these devices, you have six places to plug in cables. On this one, you’ll see:
Let’s grab our battery, charge controller, cables to connect our battery, and our small Phillip’s screwdriver. Please do this step before connecting the solar panels to the charge controller as it will damage the charge controller without first connecting to the battery.
If you look at this charge controller, and this is common amongst most of these devices, you have six places to plug in cables. On this one, you’ll see:
- Two holes with PV+ and PV- … PV simply means photovoltaic. This is where we’ll connect solar later.
- The next two holes are what we’re interested in at this step: BAT+ and BAT- … this is where we’ll connect the cables from the charge controller to the battery.
- The last two holes are LOAD which we won’t cover in this blog.
Step 2: Connecting the charge controller to a solar panel
 For this step, we’ll grab our 100-watt solar panel (you can add more panels, but for simplicity’s sake, we’ll stick with one panel in this blog) and extension cables with MC4 connectors on one end and are stripped on the other end. For this step, you’ll need just the small Phillip’s screwdriver.
During this process of connecting the cables, it’s important to observe the plus and minus signs on these cables that come off the solar panels when connecting to the charge controller. In order to go from the cables on the solar panels to your charge controller, you’ll need the extension cables with MC4 connectors on one end and are stripped on the other end.
OK, we’ll keep the solar panel out of the sun, connect our extension cables to the cables coming off the solar panels that we’ll run to the charge controller. We have two black cables, that’s fine, just be careful to keep track of which is positive and negative. Even adding a small piece of tape on the end and writing a plus or minus might help a bit to keep things straight. Now, with the stripped end of the cables, We’ll start with the negative end and insert it into my charge controller. Give it a slight tug to ensure it doesn’t come out. Next, insert the positive cable into the PV+ connection and tighten it down. Remember, we have two holes on our charge controller marked PV- and PV+. Again, PV is short for photovoltaic power, which is the power coming from our solar panel.
Now, let’s put our solar panel into the sun and see what happens. So now our solar panel is in the sun, and we’re now connected. As you can see on the front of the charge controller, we’re showing a charge coming in, and we’re now officially charging our battery. With this setup, I can view this information on my app as well, along with information on how charged the battery is. So we’re now harvesting power from the sun and storing it in the battery to be used later to power appliances and devices. Pretty cool, right?
So up to this point in the video, we have now confirmed our solar panel, charge controller, and battery setup work. Now we’ll move forward to our final step of pulling power from the battery.
This completes step two.
For this step, we’ll grab our 100-watt solar panel (you can add more panels, but for simplicity’s sake, we’ll stick with one panel in this blog) and extension cables with MC4 connectors on one end and are stripped on the other end. For this step, you’ll need just the small Phillip’s screwdriver.
During this process of connecting the cables, it’s important to observe the plus and minus signs on these cables that come off the solar panels when connecting to the charge controller. In order to go from the cables on the solar panels to your charge controller, you’ll need the extension cables with MC4 connectors on one end and are stripped on the other end.
OK, we’ll keep the solar panel out of the sun, connect our extension cables to the cables coming off the solar panels that we’ll run to the charge controller. We have two black cables, that’s fine, just be careful to keep track of which is positive and negative. Even adding a small piece of tape on the end and writing a plus or minus might help a bit to keep things straight. Now, with the stripped end of the cables, We’ll start with the negative end and insert it into my charge controller. Give it a slight tug to ensure it doesn’t come out. Next, insert the positive cable into the PV+ connection and tighten it down. Remember, we have two holes on our charge controller marked PV- and PV+. Again, PV is short for photovoltaic power, which is the power coming from our solar panel.
Now, let’s put our solar panel into the sun and see what happens. So now our solar panel is in the sun, and we’re now connected. As you can see on the front of the charge controller, we’re showing a charge coming in, and we’re now officially charging our battery. With this setup, I can view this information on my app as well, along with information on how charged the battery is. So we’re now harvesting power from the sun and storing it in the battery to be used later to power appliances and devices. Pretty cool, right?
So up to this point in the video, we have now confirmed our solar panel, charge controller, and battery setup work. Now we’ll move forward to our final step of pulling power from the battery.
This completes step two.
Step 3: Connecting the battery to an inverter
 Before we proceed to this next step, we need bring in the solar panel and disconnect it. When working with this system, we don’t want to interact with our setup when actively pulling power from the solar panels. To do this, we’ll simply disconnect the cables from the solar panels connected to the PV+ and PV- connections on the charge controller. We’ll also want to disconnect our charge controller from the battery. To do this, unscrew the positive bolt first on the battery and remove the positive charge controller cable. Next, unscrew the negative bolt on the battery and also remove the negative charge controller cable.
Now that we’ve disconnected our solar panel and charge controller from the battery let’s connect our inverter to the battery. To do this, let’s first connect our cable to the inverter first, not the battery first. Connect the positive inverter cable to the positive inverter post and then connect the negative inverter cable to the negative post on the inverter. Now we’re ready to connect the inverter to the battery, but before we do this, it is recommended that we put a fuse on our positive inverter cable to protect the inverter. We have a 2000-watt inverter, so a 175 to 200 amp fuse works fine. We’ll post a link below to where we purchased mine. When connecting the fuse to the positive inverter cable, be sure that the fuse is flush with the lug. Make sure there’s no washer in between the inverter cable lug and the fuse.
Now, bring the negative cable from the inverter and connect it to the battery. Then, using the bolt on the cable that connects the fuse to the cable, place it on the positive battery terminal. It will spark, but this is to be expected. Finger tighten these bolts down to allow us to test this out. We’ll tighten it much tighter momentarily when add the charge controller back on.
We have completed the connection of the inverter to the battery. We can plugin devices and appliances and power them as shown here.
Earlier, we disconnected the charge controller, but we’ll add it back now. We’re basically just repeating step 1 at this point. We’ll begin by removing the inverter from the positive terminal and negative terminal of the battery. Bring the negative cable from the charge controller and connect it to the negative post on the battery along with the lug connecting the negative cable to the inverter and tighten down the bolt with a wrench. Next, we’ll bring the positive cable from the charge controller and add it to the positive post on the battery along with the lug from the cable connecting to the inverter. Again, we’ll tigthen this down with a wrench. It’s important to note that when tightening the lugs on the cables to the batteries that there’s no washer in between the battery post and the lugs on the end of the cables. You want these lugs flush on the battery post. We do want the washers on top of the lugs, pushing them down to the battery post, though.
Finally, we’ll connect the solar panel back to the charge controller. Connect the negative cable first, then the positive cable.
Before we proceed to this next step, we need bring in the solar panel and disconnect it. When working with this system, we don’t want to interact with our setup when actively pulling power from the solar panels. To do this, we’ll simply disconnect the cables from the solar panels connected to the PV+ and PV- connections on the charge controller. We’ll also want to disconnect our charge controller from the battery. To do this, unscrew the positive bolt first on the battery and remove the positive charge controller cable. Next, unscrew the negative bolt on the battery and also remove the negative charge controller cable.
Now that we’ve disconnected our solar panel and charge controller from the battery let’s connect our inverter to the battery. To do this, let’s first connect our cable to the inverter first, not the battery first. Connect the positive inverter cable to the positive inverter post and then connect the negative inverter cable to the negative post on the inverter. Now we’re ready to connect the inverter to the battery, but before we do this, it is recommended that we put a fuse on our positive inverter cable to protect the inverter. We have a 2000-watt inverter, so a 175 to 200 amp fuse works fine. We’ll post a link below to where we purchased mine. When connecting the fuse to the positive inverter cable, be sure that the fuse is flush with the lug. Make sure there’s no washer in between the inverter cable lug and the fuse.
Now, bring the negative cable from the inverter and connect it to the battery. Then, using the bolt on the cable that connects the fuse to the cable, place it on the positive battery terminal. It will spark, but this is to be expected. Finger tighten these bolts down to allow us to test this out. We’ll tighten it much tighter momentarily when add the charge controller back on.
We have completed the connection of the inverter to the battery. We can plugin devices and appliances and power them as shown here.
Earlier, we disconnected the charge controller, but we’ll add it back now. We’re basically just repeating step 1 at this point. We’ll begin by removing the inverter from the positive terminal and negative terminal of the battery. Bring the negative cable from the charge controller and connect it to the negative post on the battery along with the lug connecting the negative cable to the inverter and tighten down the bolt with a wrench. Next, we’ll bring the positive cable from the charge controller and add it to the positive post on the battery along with the lug from the cable connecting to the inverter. Again, we’ll tigthen this down with a wrench. It’s important to note that when tightening the lugs on the cables to the batteries that there’s no washer in between the battery post and the lugs on the end of the cables. You want these lugs flush on the battery post. We do want the washers on top of the lugs, pushing them down to the battery post, though.
Finally, we’ll connect the solar panel back to the charge controller. Connect the negative cable first, then the positive cable.
Step 4: Testing our setup
 Alright, it’s the moment of truth. We’ve got solar charging the battery, so let’s turn on the inverter and power some devices. Excellent, everything is operating as expected. We’ve got a pure sine wave coming off the inverter which means we can safely power our electronics and appliances. You can power most devices that you could normally power through a typical wall socket in your home, such as a T.V. or refrigerator.
One important detail about discharging this battery. There’s a level of charge you don’t want to exceed when drawing power with the inverter. You can safely discharge down to 20% of the battery’s capacity under load with the inverter powering devices. If you go under 20% while you have a load on it, it can damage the battery. You can buy a battery monitor to add to the battery to keep track of that. For this battery, it does come with Bluetooth, and we can monitor that information in the app.
Alright, it’s the moment of truth. We’ve got solar charging the battery, so let’s turn on the inverter and power some devices. Excellent, everything is operating as expected. We’ve got a pure sine wave coming off the inverter which means we can safely power our electronics and appliances. You can power most devices that you could normally power through a typical wall socket in your home, such as a T.V. or refrigerator.
One important detail about discharging this battery. There’s a level of charge you don’t want to exceed when drawing power with the inverter. You can safely discharge down to 20% of the battery’s capacity under load with the inverter powering devices. If you go under 20% while you have a load on it, it can damage the battery. You can buy a battery monitor to add to the battery to keep track of that. For this battery, it does come with Bluetooth, and we can monitor that information in the app.