
“Anywhere the struggle is great, the level of ingenuity and inventiveness is high.”– Eleni Zaude Gabre-Madhin
There are several dangerous aspects to a post-disaster open fire or even a fire in the wild. High winds can make your fire difficult to light, and sparks can cause your fire to grow and potentially become out of control. Smoke and radiating light from the flames can announce to all the locations of your encampment and attract undesirable people that could threaten your safety. Still, having a safe fire after a disaster could mean the difference between life and death for you. Fire is a prepper’s essential tool, and it’s key to survival. Fortunately, the ancient indigenous people of North America developed a method to deal with all of those issues. And we are going to follow their model in this video and build what is commonly called a Dakota Fire Pit or a Dakota Fire Hole. In this video, I will explain how to build a basic Dakota Fire Pit, why it’s far superior to an open campfire and why it was probably developed in the first place. Let’s break some ground…
HOW TO BUILD IT
 The Dakota Fire Pit is essentially just two holes in the ground that connect up. Your slightly larger fire hole is fed by the smaller hole that should be at least as big around as your fist and will open up at the bottom of your larger fire pit hole.
Having a steep-sided, narrow, and deep fire hole will protect your fire from high winds, which will help you get it started under challenging conditions. The sides of the fire pit will also focus the heat energy upwards and not in all directions like a campfire. This will allow you to generate a concentrated heat sufficient enough to boil water or cook in a very short amount of time.
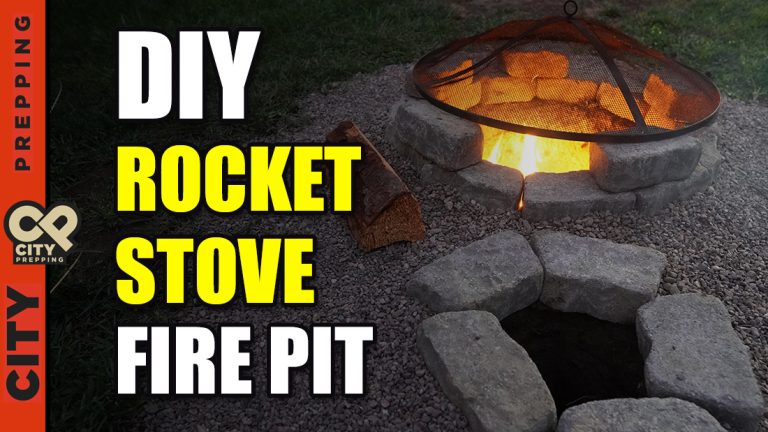
My Dakota Fire Pit will be a permanent fixture in my backyard. That’s the only way I could sell it to the wife, for one, and second, I plan on using it after any disaster where my usual means of cooking are offline.
I start by laying out the bricks I want at the base of the fire pit chamber. You don’t need to do this or worry about rocks in your pit. I’m only doing this to provide an excellent foundation for my permanent pit. With the bricks laid out, I used a shovel to outline the hole. After this, I remove the ring of bricks and proceed to dig the main pit. As mine will be a permanent fixture, I am going big, so I want my main hole to be at a depth of almost two feet and about 2 inches across. I will end up stacking three layers of stone around the ring, so this will give me added depth. My finished hole with that ring will be almost 3 feet deep with a width of about 20 inches. Because I’m not a true 2 to 1 ratio, I’ll probably get a little smoke.
Your ratio should be around twice as deep as your whole is wide. Yours can be as little as a foot deep and a mere 8 inches round, but it must then be 16 inches deep. You always want the hole deeper than it is wide. This will concentrate the heat upwards and will allow you to contain the flames within the hole.
So, I dig and dig, break rocks, and dig. Your smaller Dakota Fire Pit can be dug by hand or even with a small shovel. Your soil may not be as compacted and hard. You don’t want your pit collapsing in on itself, so really, the only caveat is not to build it in the sand. You can use the dirt you remove to build up a rim around your main fire hole, or you can use it to build a trough and channel the breeze or wind into your air intake hole. I used a variety of tools to try and make the job easier. Again, you will want to go smaller to make your pit.
Next, you want to dig your air intake hole upwind from your larger fire hole. I don’t have much of a breeze because of my fences, so I’m just digging the vent hole a little bit away from the main hole. Your air intake hole will be at a 45-degree angle to your larger hole. For mine, I will go straight down and then curve it to that angle after about a foot down. When I felt like I was close to connecting, I started digging out from the base of the firepit. I used a little water in the air intake hole to soften the soil, and so I would know when the two holes connected. You won’t want to do this if you plan on using your Dakota Fire Pit the same day you are constructing it, as the water will create more smoke and make lighting your fire more difficult. In my case, the water allowed me to smooth and mold the sides.
I then placed my ring of bricks in the base and the brick above the intake hole to allow air to flow. You will want to put rocks around the ring of your pit if you’re going to cook over it, as these rocks will create a base for your pan to rest upon. Lacking any cookware or rocks, you can criss-cross green wood over a lower fire to create a makeshift grill. I placed some flat paving stones at the bottom to provide a good surface for the fire when dry and then ringed the hole with my angled flagstone retaining wall blocks. If I find my fire hole isn’t deep enough, I can do several layers of these stones to chimney it up. You can accomplish the same thing for your pit by using the dirt you remove from it to chimney up the sides.
For the air intake hole, I ringed it with stone only for the sake of appearance. It isn’t necessary and will actually work better for you when the low air is unencumbered. I then stacked a second layer of stones on the top of my main ring. This will support a fire screen to arrest sparks and later a grill. Since my pit is a permanent fixture, I finished it by laying pebble rocks around the rings.
With it finished, I just needed to let it dry out because of the water I used, and then I could light it. To light it, I threw in some paper and went with a standard teepee structure for staking the wood. There was some regular smoke because of the paper, the wetness of the wood, and because the pit was still considerably damp. That did subside once the heat was sufficient.
When the fire was low, I used a leaf blower on the intake hole, and you can see how efficiently it stoked the fire without blowing reckless sparks and embers everywhere. In a survival situation and with a narrower, more concentrated fire hole, you could easily use this design to create a makeshift kiln or forge.
BENEFITS OF A DAKOTA FIREPIT VS. AN OPEN FIRE
 The indigenous people of the high great plains faced high winds on grassy plains. These people, largely nomadic, followed the bison. They couldn’t risk an out-of-control prairie fire, nor did they want to signal any enemies of their presence on the low flatlands. An open campfire wasn’t practical, and the high winds made even lighting one problematic. It is thought that out of this necessity, the Dakota Fire Pit was created.
I already mentioned some of the benefits of the fire pit, but here they are again, plus a few more. First, the oxygen feeding in at the lowest point of the fire through the smaller hole and circulating around the base of the fire discourages smoke. The fire burns hotter, as a result. The larger fire chamber, technically called a pyrolysis chamber, has enough of a rise to focus the heat towards the center and up like a rocket stove. The high heat reduces the sloppy chemical transition of the biomass to complete combustion. In layman’s terms, the more efficient the biomass conversion to flame, the less likely smoke will be generated and the more heat and light energy created.
A typical campfire loses much of its heat out the sides. A Dakota Fire Hole focuses the heat up the fire hole. This allows you to use a minimal amount of material but create a fast and very concentrated heat like a rocket stove. Your Dakota Fire Pit can be much smaller and probably will be if you are not in a more permanent location. The smaller size will allow you to use simple kindling like twigs to generate enough heat to boil water, stay warm, or cook.
If your fire is burning slow or having difficulty with the materials you are burning, you have to get low and blow into the sides of a campfire. It’s not the most efficient method. Even with my larger-sized fire hole, I found that blowing down the air intake hole concentrated the air and stoked the coals at the base. I also used a leaf blower on it and had my fire burning like a jet engine.
When your fire is done, instead of leaving a pile of smoldering ash, you can fill the hole in with the dirt you removed and leave no trace or evidence that you were ever there. You don’t risk embers reigniting in the wind, and you cover your tracks and maintain your operational security better.
—
When you want an efficient, low smoke fire after a disaster or on your next campout or wilderness trek, the Dakota Fire Pit is definitely the way to go. Hopefully, this video has provided enough information to get you started. If you have ever built one of these or you plan to, let me know how it went in the comments below. I read many of the comments and respond to them when I can. That is typically within the first hour of releasing a video. I can notify you when other videos become available only if you take that step to subscribe to this channel by clicking that button. It’s a little thing, but it helps us grow this community.
As always, please stay safe out there.


2 Responses
Really appreciate all the great content. Congrats on well earned success.
I’m looking forward to digging my permanent Dakota fire pit. Thank you for the detailed explanation!