

Hi Everyone,
NOTES:
***I had a wonderful conversation with Karen about storing food and NOT getting bugs. Here is a great article if you want to store food in buckets:
Supersizing Food Storage with BUCKETS – Prepared Housewives
She has some great recipes on this website as well. I’ve included a few of them below.
GARDEN HAPPENINGS: I was looking up “start” dates and realized that I missed the boat and SHOULD have planted my broccoli indoors 6 weeks ago! NOW is the time to set broccoli and cauliflower out. Neither of those plants like the hot weather, and you want to have a crop harvested before summer. They are both able to withstand a light frost, so here in zone 9b, that’s perfect. We DO have occasional frosts, but they are pretty mild. Yesterday I happened to stop by my local Walmart, and they had broccoli plants already 5-6 inches high–6 plants for $6. Yay!!! I’ve never had good luck with broccoli, but now I suspect it’s because I’ve always planted too late.
I also picked up 2 blueberry plants.
Notes about blueberries: 1) you need two plants of different varieties so they can cross-pollinate 2) if you are planting in pots, get BIG ones 3) they are finicky about soil pH, so get a small bag of fertilizer especially for blueberries at any garden center 4) they like sun
I have tomatoes, peppers, celery and basil seeds started and under the grow lights. I have a tray of lettuce that is ready to be transplanted outside. In addition to saving money, the biggest benefit of starting seeds indoors are the happiness endorphins that come from watching “my babies” grow!!!
LONG TERM STORAGE: dried beans

Dried beans have a very long shelf life. However, over time, they will “get old”. I can identify.
The first suggestion is to soak overnight. I usually do the “quick soak” method for beans. I boil them in UNSALTED water for 3 min or so, then turn off the heat and let them soak for 1 hour. I read once that this is the best method for making beans less gassy. But for old beans, an overnight soak might work better.
Another idea is to add baking soda. Not much!!! 1/4 – 1/2 tsp per pot of beans at the most. This will help the beans to soften.
Another idea is to crack the shells. This suggestion says to take a hammer and have at them! OR to put them in a bag and drive over them in the car.
One article suggested using a pressure cooker. I HAVE a pressure cooker, but it has a 23 quart capacity and is not practical for lugging out just to cook cups of beans. But…. I also have an instapot. I’ve used it exactly once maybe. It’s just hard to teach an old dog new tricks.
I’m pretty sure I have cans of beans that are approaching 50 years old – almost as old as I am. LOL
I thought this article was great:
How to Soften Old Beans with Baking Soda – Rill’s Specialty Foods Here’s what she says about adding baking soda: We did several tests, but our favorite method was to use 1/4 teaspoon of baking soda per pound of old beans and to soak the beans for 4 hours. After the soaking stage, we rinsed the beans and added 1/4 teaspoon of fresh baking soda per cup of beans.
Replacing the used baking soda can continue the mineral breakdown of pectin, calcium, and magnesium. Compared to the “earthy” flavor of the control beans, the baking soda beans have a “cleaner” taste, which some might call soapy. The color of the baking soda beans were a much richer red, whereas the regular beans were a dull brown.
I guess what I SHOULD do is get my Instapot down and try cooking beans that are fresh. Then I can experiment with the old beans. All I know is, when we are finally forced into cooking those old, old beans, there will be a giant learning curve!!!
Instant Pot Beans: How to Cook Dried Beans {No Pre-Soaking Required}
SHORT TERM STORAGE: tomato sauce
25 cans
Tomato products tend to darken over time. Ketchup is the first to darken.
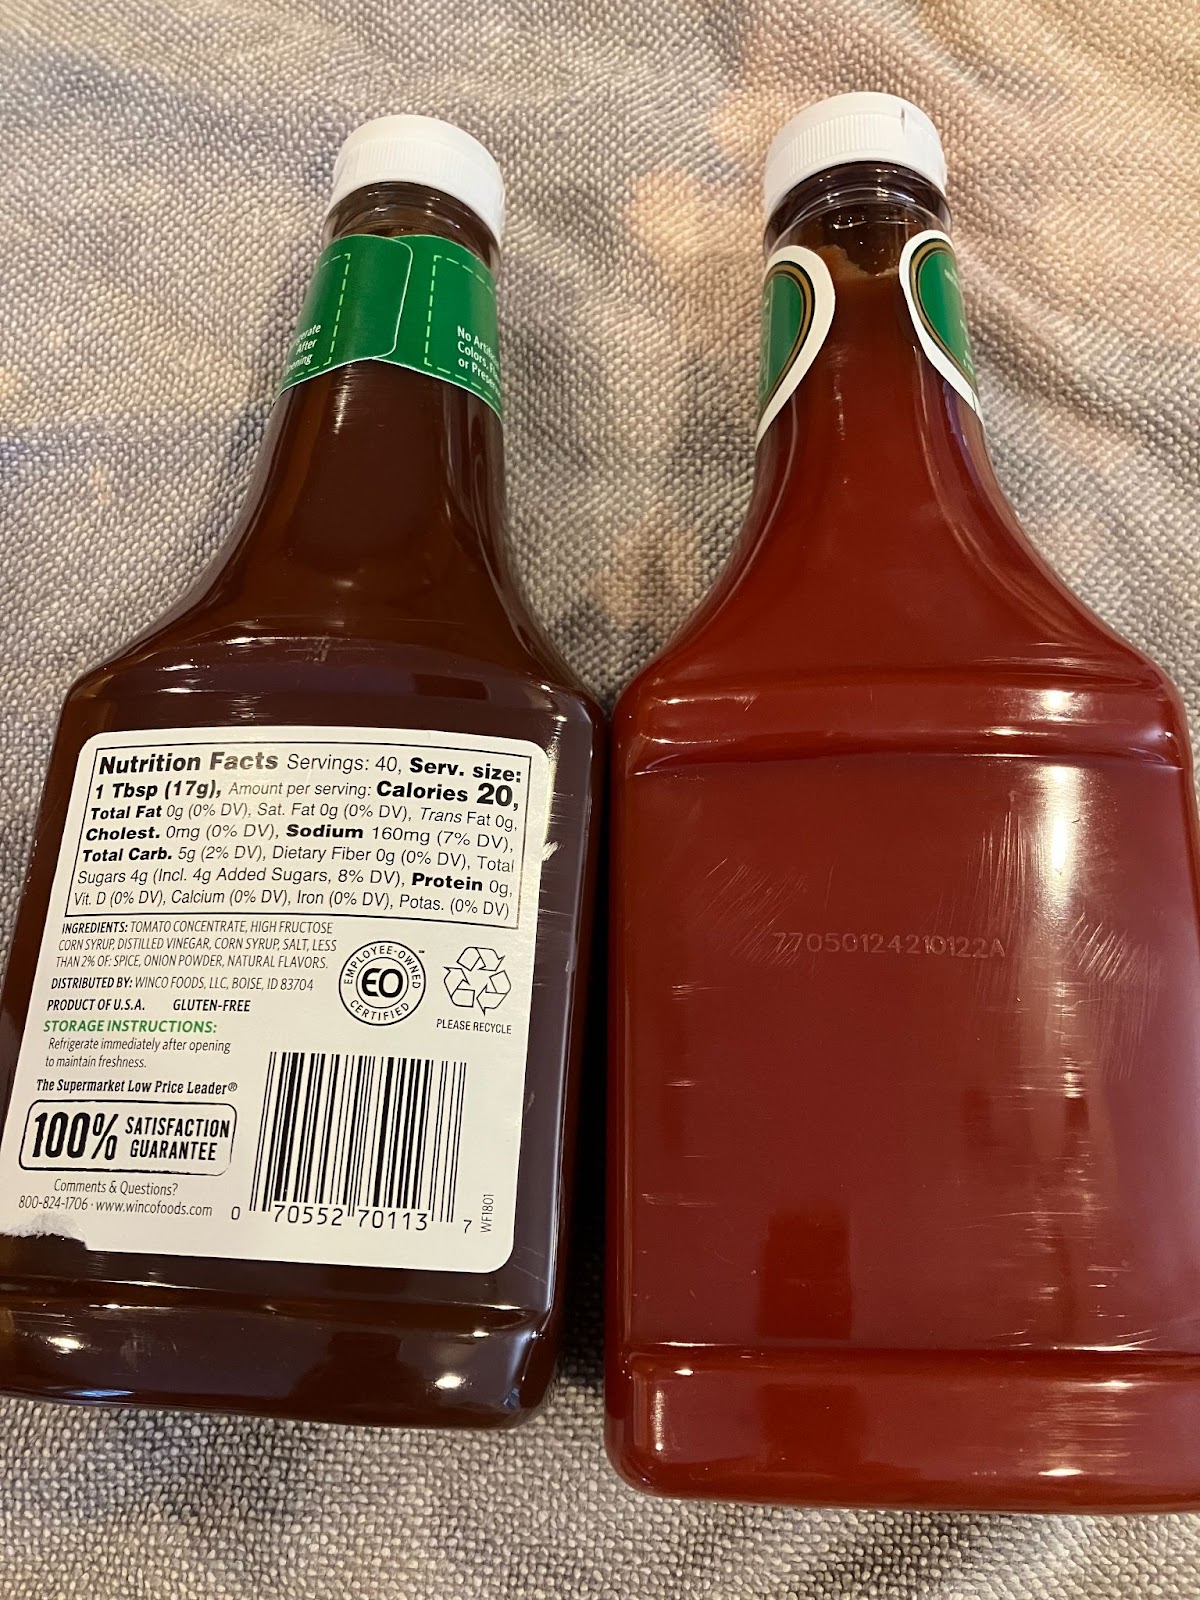
The bottle on the left is 2 1/2 years old. The bottle on the right is 6 months old. The expiration date is 2 years.
Tomato paste also darkens quickly. I have found that after a year, I’m unsure what I will find upon opening, so I always have a back-up ready.
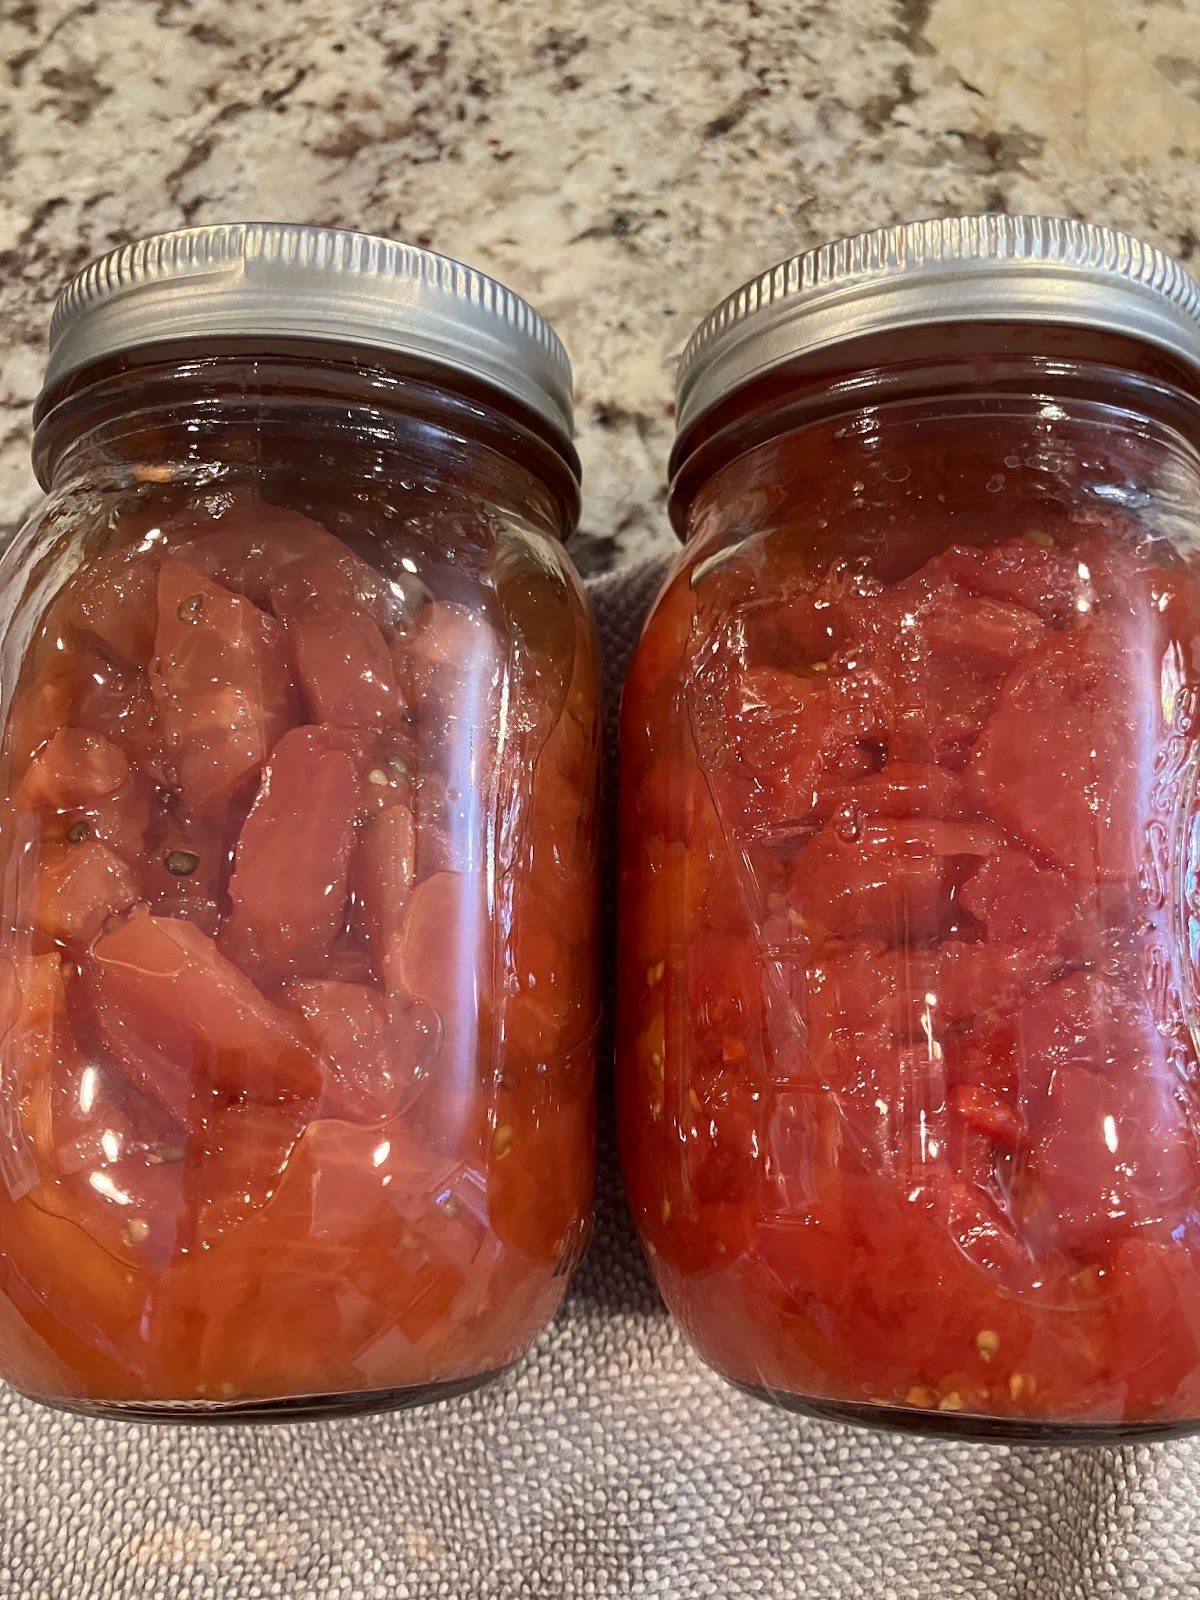
Even diced tomatoes will darken.
The jar on the left was canned in July 2019. The jar on the right was canned July 2022. The discoloration is minor, but when you open them, the tomatoes on the top may be even darker. I just scoop them out and toss them. Because light is a factor, I always keep my canned jars in a dark place. These are under the bed. It makes gathering ingredients for dinner a scavenger hunt for sure!
Having said all of that, I find that tomato sauce lasts the longest. I store several “flats” of tomato sauce (24 cans to a flat). I store the small size, it fits the best in my small space and there are only two of us, so that’s all I usually need. I put the new flats on the bottom, so I’m always using the oldest cans on the top. It’s a pain having to “re-stack” everything, but you MUST rotate so just DO IT!
72-HOUR KITS: pictures!!
After dinner tonight, take everyone’s picture. Then walk around your house and take pictures of each room and closet. Have your kids each take a room. If you have time, upload those pictures to a flash drive (or two). It wouldn’t hurt to take pictures of your insurance policies, and other bills so that you have the account numbers, etc. If you are like me, most of that information is online. BUT, if you are like me, you have a book with all your accounts and passwords written down. You better make sure that book is with you if you have to evacuate, OR you can just take pictures of all the pages and transfer that to the flash drive. DON’T keep those on your phone!!!
FOOD STORAGE RECIPES:
Today’s recipes are from Prepared-housewives.com
Pasta Fagioli Soup
Pasta Fagioli Soup – Prepared Housewives
2 cans beef broth
1 can Great Northern beans, rinsed and drained
1 can diced tomatoes, undrained
2 medium zucchinis, quartered lengthwise and sliced or
2 c. freeze dried zucchini
1 TB olive oil
1 1/2 cloves minced garlic
1/2 tsp dried basil
1/2 tsp dried oregano
Combine in a slow cooker and cook on low for 3-4 hours
1/2 c. uncooked small shell pasta – stir in. Cover and cook 1 hour or until pasta is tender
Serve with croutons and cheese. Garnish with fresh basil if desired.
** There are a few places online to get freeze dried zucchini. Here is one of them: Freeze Dried Sliced Zucchini – Freeze Dry Wholesalers $30 for 2 oz. freeze dried zucchini which is the equivalent of 2 lb. fresh zucchini.
Chewy Granola Bars
4 1/2 c. rolled oats (you can do a combination of regular oats and quick oats)
1 c. whole wheat flour (you can use white flour too)
1 tsp baking soda
1/2 tsp salt
Here is where you want to add your “add-ins” listed below
In a saucepan
1/2 c. butter
2/3 – 3/4 c. honey
1/4 c. brown sugar
1 tsp vanilla
Melt all together. Pour over the oats and mix well. If mixture is too dry, add a little more honey.
Press into a cookie sheet. If you want thick bars, use a 13 X 9 pan. Press firmly. If it doesn’t fill the whole cookie sheet because you like them thicker, it’s okay to leave space.
Bake 325 for 18-22 min.
Remove from oven and press down again with a spatula.
Let cool for 10 min. in pan and cut into bars.
They will crumble if you take them out too soon or don’t press them firmly enough. You can wrap them individually or place in an airtight container. They freeze well.
Add on’s include
1 c. chocolate chips and 1 c. marshmallows
1/2 c. chocolate chips and 1/2 c. peanut butter chips
craisins, coconut, chopped almonds
1/2 tsp cinnamon
raisins
Any type of seeds or dried fruit
Easy Country Biscuits
EASY Country Biscuits from Scratch – Prepared Housewives
preheat oven to 425˚
2 c. flour
1 TB baking powder
1 tsp salt
1 TB sugar
Combine in a large bowl.
1/3 c. shortening – cut in with a fork until the mix resembles coarse crumbs
1 c. milk
Gradually stir in milk until dough begins to form a ball.
On a well floured surface, dump out the dough. It will be sticky.
With floured hands, sprinkle the top with flour and turn the ball over once or twice to lightly coat it with flour, just enough that it is not super sticky. The top should be dusted but inside it should still be doughy and sticky. The less you knead and press it, the fluffier your biscuits will be.
Using just your flour-dusted hands, gently press the dough out until it is about 1 inch thick.
Press it out in any random blob shape and then cut circles with a 2/5-3 inch diameter round cookie cutter.
Transfer the biscuits to your greased cookie sheet and bake 425˚ for 13-15 min or just until they begin to turn the faintest shade of brown.
Marti Shelley

Hi Marti, I am 76 and I never did like the big pressure cookers so have switched to freeze drying just about everything. However, the Instant Pot is my best friend in the kitchen…Not sure which model you have, but they all seem fairly straightforward. If you have any questions about them, YouTube has many good instructional videos. I hope you can learn to use it…the reason I like it so much is that the results – say frozen green beans, yogurt, applesauce – always come out the same. I also think it does a much better job than the microwave on veggies. I have used it for yogurt and it is terrific. I really enjoy your column. Hope you have a blessed gardening season too- Here in Ohio it was 10`F this morning!